

 July 12, 2017
When many homeowners begin thinking about hiring a professional to update their outdoor living space, a deck is often a default item on their list.
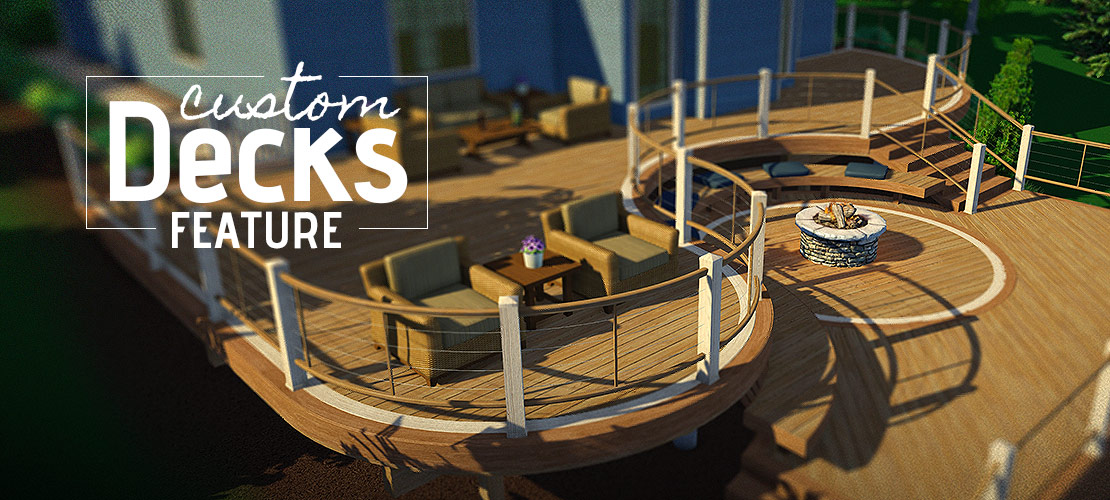
That’s why decks often rank as one of the top upgraded outdoor structures — and also why decks offer designers a great opportunity to amaze clients with a phenomenal custom design.
A custom deck is a great way to transform a mundane space into a spectacular showpiece. And creating and customizing the perfect wood deck for your client is easy — when you have the right tools at your disposal.
After all, the upgrades homeowners want don’t stop with the deck: many homeowners updating their decks often also choose to upgrade other features as well, including the lighting.
In order to help you create exactly the right decks your clients want, we’ve created an all-new Wood Decks tool in the Hardscapes and Decks stage.
With beautiful new wood options, precise new structural choices, and user-friendly tools that work together far more seamlessly than standalone 3D deck design software — the Wood Decks feature now makes creating the perfect custom deck easier than ever before with the professional deck design software.
Creating a Wood Deck
_Photos/2017/summer-2017-update/wood-deck-01.jpg "Custom Wooden Decks")
In the Hardscapes and Decks stage, simply draw out a shape to the desired dimensions of your new wood deck.
For example, if you wish to create a wood deck that starts at the corner of your client’s house, first use the line tool to create an 18 foot 6 inch square with professional deck design software.
Once complete, double check that the Wood Deck option is selected, not Hardscapes. (Any shapes drawn in this stage can be switched between Wood Deck and Hardscape at any time.)
When you switch to 3D, you’ll immediately be able to see the wood deck. And with 3D measurements, you can instantly show your clients as well as your installers all of the important details that make your design exactly right for your client’s space.
3D deck design software has never been so easy!
 |
Customizing a Wood Deck
It’s easy to adjust wood decks by simply double clicking on any given section. As you double click on each section of the deck, the panel menu updates to show you the options available.
(Some features are not available in Pool Studio, but all are available in Vip3D and VizTerra 3D Deck Design Software.)
You can also click on the various sections in the panel menu switch as well.
For example, you might choose to adjust the deck’s height until it is flush with the client's second story sliding glass door. With the new options available to you, including 3D measurements, you can easily add just the right custom details that will make your new wood deck exactly right for your client with professional deck design software.
_Photos/2017/wood-deck-feature/wood-deck-surface-boards.jpg "Wood Deck Surface Boards")
_Photos/2017/wood-deck-feature/gui-surface.jpg "Deck Surface GUI")
Surface Boards
Double clicking on the surface boards or selecting them from the panel is an easy way to make sure that the surface boards are active. Once they’re active, you can quickly turn them on and off.
What can you do with surface boards?
- (Vip3D and VizTerra) Overhang the boards past the framing, adjust the overhang distance, and even select options for individual surface boards
- Adjust each board individually. Because each board is individually created (when active), you can adjust each board’s width, choose how large or small of a gap appears between each board, and adjust the angle of the boards by using the arrows or by typing in a value (like 45).
_Photos/2017/wood-deck-feature/wood-deck-divider.jpg "Wood Deck Miter Boards")
_Photos/2017/wood-deck-feature/gui-miter.jpg "Deck Miter GUI")
Miter Boards
In VizTerra and Vip3D, you can also select miter boards.
It’s easy to choose how many miter boards appear on the deck. You can also adjust the size of the miter boards and choose whether they should appear along the House.
Dividers
To use dividers, simply return to 2D and, with the deck selected, click Insert Divider.
Once inserted, a divider board will separate the surface boards for the wood deck and the framing underneath. You can adjust the width to make sure the placement is ideal.
In 3D, the divider boards will make it possible to view the deck as two unique planes, which you can double click on to adjust and to change the material individually.
_Photos/2017/wood-deck-feature/wood-deck-support.jpg "Wood Deck Support Beams")
_Photos/2017/wood-deck-feature/gui-support.jpg "Deck Support Structure GUI")
Support Structures
Under the wood deck, there are several components. It’s easy to change the settings for these support structures.
For example, to adjust the joists, double left click to select them and then pick from the options on the panel menu:
- Turn joists off and on
- Control rim joists
- Set spacing
- Select thickness height and inset
- Choose how far the support beams cut into the joist
- Add extra joists
It’s also easy to select individual joists if necessary to move or delete them from the deck.
Support Beams
When creating a custom deck, the spacing, thickness, and height of the support beams can be adjusted quickly — and any necessary extra support beams can be added easily.
As the settings are adjusted, the professional deck design software will automatically update. For example, if the spacing is adjusted, then additional beams will be added or subtracted automatically.
If you wish to return the piece to its original location, simply click the reset button next to each control.
_Photos/2017/wood-deck-feature/wood-deck-posts.jpg "Wood Deck Posts")
_Photos/2017/wood-deck-feature/gui-posts.jpg "Deck Posts GUI")
Posts
The settings for the deck posts can be adjusted as easily as the settings for the support beams. You can turn the posts on and off, adjust the spacing and thickness, and manually add extra posts. You can also use the Move tool to move any posts.
In VizTerra and Vip3D, pier caps can be added to the bottom of the posts.
_Photos/2017/wood-deck-feature/gui-fascia.jpg "Deck Facia GUI")
Fascia
In VizTerra and Vip3D, the deck fascia (including the height of the fascia) can be adjusted.
In Pool Studio, VizTerra, and Vip3D, you can even add a skirt to the deck.
Both features are easy to turn on and off.
Staircases
If you need to add a staircase to your deck, click the Create Staircase button in 2D and place it.
Once placed, you can easily adjust the new staircase in 3D. For example, you can choose the Stringer option, and achieve a cutout appearance.
_Photos/2017/wood-deck-feature/stairs-and-rails.jpg "Wood Deck Stairs and Railings")
Railings
You can also add railings to your wood deck in 2D. Simply click the Generate Railing button — you’ll see railing added around the wood deck (except at the house). It will even go down the staircase!
To adjust the railing settings, go to the Walls, Fences, and Railing stage. From that stage, you’ll see that the new railing is linked to the wood deck, which makes it easy to move it around the project — without the objects separating.
_Photos/2017/summer-2017-update/wood.jpg "New Wood Finishes")
Finishes
In the Materials stage, you can access the Wood category to pick exactly the right finish for your deck.
To adjust the deck’s appearance, select any part of the deck. You can choose options from the structural category to update the miter and fascia. And, with the Skirts category, you can update the skirt as well.
The 3D deck design software will automatically remember your choices — and automatically apply them to the next wood deck that you create.
Ready to Share Your Wood Deck?
Once you’ve created a new wood deck, it’s ready to share with your clients. Not only can you custom select each and every detail — but you can also highlight those details for your clients (and your installers) by using 3D Measurements to reveal just how perfectly your design fits your client’s space.
When you take advantage of custom, professional, 3D deck design software — you can also save your new deck to your own library, making it easy to insert your custom work instantly into your next project.
Any questions? Drop us a comment! We’re here to help.
|


Comments