

What’s the biggest drain on your time, when you start a 3D outdoor living design?
Many professional landscape designers say that gathering elevations and measurements takes up a lot of their time.
How much time do you spend measuring a client’s home? Figuring out the property line? Triangulating existing obstacles that you need to work around? Calculating terrain elevations?
These are some of the most important parts of a successful design, but they can also be the most time consuming.
Save time with high-resolution aerial imagery. Vip3D, Pool Studio, and VizTerra, not only provide accurate aerial imagery but also automatically generate 3D terrain models based on the surveyed elevation data of your client's property.
Why Are Aerial Images So Awesome?
You've probably tried to use online maps to get images for your 3D design or to get a better idea of your client's property.
If you have, you’ve probably run into the same problems we’ve experienced: those images are unreliable. They simply aren't detailed enough to help you understand a client’s property. And while the technology for more detailed images is available, regulations mean that companies are only allowed to sell satellite images between 12-20" per pixel. That resolution is just too low to use to design an outdoor living space.
That's why we now use aerial images from airplanes (from 60 airplanes in fact). Unlike satellite imagery, airplane imagery is not limited by government regulations. That means you can now access constantly updated, constantly improving aerial images down to 1" per pixel!
Satellite images vs Aerial Images
The satellite images simply can't be used for design purposes. Why not?
1. The image is too blurry.
2. The property and house is skewed. Even if the measurements were accurate, how would you be able to see where the real edges of the house or property are?
3. Harsh shadows and inaccurate coloring make it impossible to pick out the features you need. Does the site have enough access? Is there an existing patio in the backyard? It's hard to tell.
4. Where is the property line? There is no reference.
The aerial images are exactly what we need. Why?
1. Tracing the image is easy, because the resolution is so high.
2. Accurate measurements are possible since the image is taken straight down on the property address.
3. Specific features on the property are easy to distinguish because of the high-contrast coloring and high resolution.
4. Overlaying a property line on the image is quick and makes for easy reference.
How To Maximize Aerial Images
1. Understand the limitations of a property before you visit
Save time by understanding in advance what to expect at your client's home. What will you need to design around once you are onsite? What does property access look like? How many existing structures are there? Can the property even accommodate a swimming pool?
2. Change your work flow: measure first
Make the most of your valuable time onsite and use the aerial images to take measurements before you visit. Instead of having to leave the client alone while you measure, you’ll have more time to learn from them what they really want and discover which features will improve their lives the most.
3. Learn about the client in advance
Get a feel for your client’s style at the same time that you learn about their neighborhood. What does their house look like? From details like what type of car they drive, the size of nearby homes, and the types of pools common to the neighborhood, you’ll be able to gather useful information simply by typing in your client's address.
4. Take on remote design work
Are your pool and landscape designs so good that clients from other areas are asking you to design their properties? With just their property address, you can add more design projects to your portfolio -- without having to travel.
5. Design on aerial images
As your 3D design takes shape, it will be on top of your aerial image. Once the project is sold, you'll use this layer to get permit approval, mark site access, or make notes on real-world images.
6. Bid small projects quickly
How many square feet is the driveway? Just trace it, and Vip3D, Pool Studio or VizTerra will tell you instantly.
How does it work?
Step 1. Click the "GIS Imagery" button in Stage 01: Project . . .
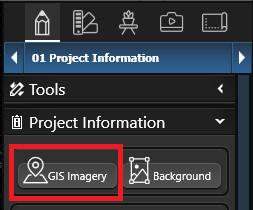
. . . and type in the address.
Step 2. Get the image details
After you type in a property address, the system will make sure the address is valid. The system will then display the quality of the image and the date the image was taken.
It's very important to pay attention to this information. Although it works great for most properties, you'll want to make sure, especially with smaller properties, that your image quality is 3-4" per pixel or "Good."
It's also important to note the date the image was taken, especially when working in new development areas. As a general rule, the more populated the area, the greater the image quality, and the more recent the images will be.

Step 3. Purchase the image address
Each purchased property address costs one credit. Credits vary in price depending on how many are purchased:
- 1 Credit: $12 = $12 per property address
- 5 Credits: $55 = $11/address
- 10 Credits: $99 = $9.90/address
NOTE: GIS credits are valid for one year from date of purchase. If not used, credits expire after one year.
Step 4. Download the images
Once purchased, the images will be downloaded, along with the terrain elevation data.
The main image will be a high-resolution, top-down property image. The software will automatically scale the image and place it behind the drawing grid.
You can then quickly trace out the house and the property's features. It's so fast that you can also trace out neighboring houses to add a greater sense of realism to the final project.

The four angled images (north, south, east, and west) will be saved to your project's screenshots folder.

Step 5: View the terrain data
This terrain data is based on surveys done in the area. Keep in mind that terrain elevations may have changed since they were last recorded; in fact, it's possible that they haven't been updated since the property was first developed.
Even in that worst-case scenario, however, the automatic terrain lines will still be helpful to you: they'll give you a sense of the area’s grade as well as a big head start on the specific property's elevations.

Need detailed help on GIS? Visit our Help Page.

_Photos/Update_2.230/header.jpg)
