When you need to create the most incredibly precise, accurate, and detailed custom projects, the right tools mean the difference between good enough — and absolutely spectacular.
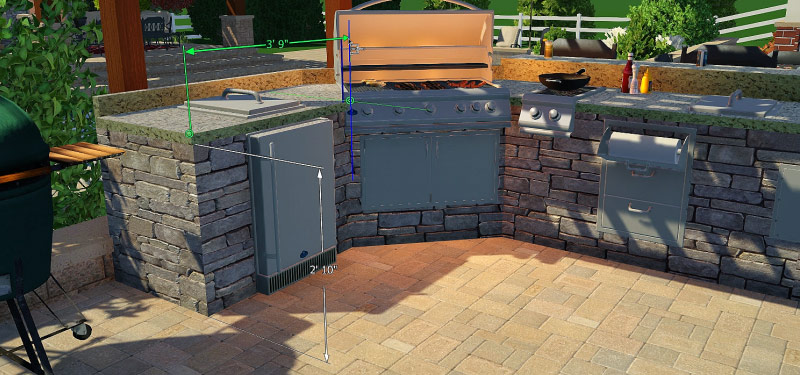
With all-new 3D Measurements, you can now share an extra level of detail with your clients and installers, making certain that the design you’ve created is exactly right.
Measure vertical components, show your installers exactly how thick the counter lip needs to be, and use 3D Measurements to keep everyone in the project on track.
Ready to see for yourself how to take advantage of the new 3D Measurements tool? Check out the video tutorial and see just how impressive these new measurements can be:
Create 3D Measurements — and Create Exceptional Designs
Outdoor kitchens, pergolas, custom decks, and more become incredibly easy to show in remarkably vivid detail with 3D Measurements.
After all — your clients don’t just want any outdoor kitchen. They want the one that you custom designed for them. And it’s the details — like the exact height of the cabinets or the space between the components — that make your custom design perfect for your clients.
That’s why 3D Measurements are now here to help you achieve the most precise, accurate designs yet.
Reveal Precise Details with 3D Measurements
When you’re designing in 3D, the 3D Measurements tool can be accessed from the panel menu (under Guides) or by simply pressing the letter C on your keyboard.
Once you decide where you’d like to take a measurement, mouse over the 3D Measurement object.
When you add a measurement to your project, you will see lines and points appear in 3D as you move your mouse around. The blue points and lines indicate nearby measurement points. When they’re active, those points and lines will turn green.
You can easily use 3D Measurements to reveal important details about your project to both your clients and your team.
For example, if you are measuring a kitchen counter, mouse over it until it has turned green.
Then, double click to quickly quickly add the measurement. The measurement (for example, 2’10”) will pop out right away.
If you need to measure a countertop, that's all it takes: simply highlight the edge until it is green, and then double click to add the measurement.
Take Precise 3D Measurements Manually
While many measurements can be taken by simply mousing over the object, some might need to be taken manually.
If you need to measure, for example, a kitchen that was drawn in several pieces, a single green line might not appear. Or, if you double click on a green line that does appear, the measurement might only cover part of that kitchen.
Instead, to get the most accurate results, you can use 3D Measurements to manually draw the exact measurement you need.
It’s a great way to show how your custom objects are precisely designed to fit your client’s space — and to make certain that your installers build to your precise specifications.
If you need to measure a kitchen that was drawn in several pieces, begin by clicking on, for example, the countertop.
Then, left click once on the green target, and, without clicking the mouse, move it to the end of the counter top and pan the view as needed. Find the green target at the end and left click once. (If you double left click, the measurement will automatically pop out. To continue measuring the kitchen, single left click instead.)
When you left click once, a red and blue line will appear. Like the object gizmo, this line indicates the directions in which you can pull the measurements.
_Photos/2017/3dmeasurements/2-axis.jpg)
Red line: pull the measurement horizontally
Blue line: pull the measurement vertically
For example, if you want to raise the measurement up to match the height of other measurements taken in the kitchen, then move the cursor to the second point, and move the mouse up along the blue line.
Once your measurement matches the height of the other measurements, let go of the mouse to set it.
To continue measuring your custom project — for example, the steps down from the upper hardscape towards the pool — it is easy to take the height and depth of any area under consideration.
If, when you mouse over a specific area, you don’t see any section to select, you can choose the Freeform Measurement Mode. Simply press and hold the CTRL key on the keyboard to begin — when you use the CTRL key, you have the freedom to start and stop the measurements almost anywhere. You’ll see additional points appear, including midpoints.
While holding the CTRL key, left click on the midpoint on the lip of the upper hardscape.
One you release the CTRL key, other points will appear where you can connect the measurement. You can click anywhere you choose. If you have the World Angle snap turned on, it’s easy to select, for example, the midpoint on the bottom step.
When measuring in this way, you’ll see not only the red and blue lines but also a green line. Like the object gizmo, the direction the measurement moves depends on the camera orientation. In the case of the below image:
_Photos/2017/3dmeasurements/3-axis.jpg)
Red: Left and right
Blue: Vertical
Green: Back and forth
If you follow the green line towards the camera, you will be able to pull the measurement away from the steps. By bringing your mouse back to the 2nd point of the measurement, you’ll be able to switch the direction in which you’re pulling.
To set the measurement, simply left click. Then you’ll see the height of the steps.
If you need to measure the depth of the steps, you can use the same two points. Instead of following the green line, however, you instead can use the blue arrow to indicate how deep the stairs are (while holding the CTRL key to get the first point).
Place 3D Measurements to Highlight Important Details
Once you’ve added 3D measurements to your project, it’s easy to move them to where you need them. Placing them in the best location makes it easy to highlight the important information — and to control the look of your project.
With the Measure tool or the Move tool, you can select exactly where you want your measurements to appear.
It’s easy to do: first, mouse over the measurements until they turn blue. Then left click, hold, and drag the measurement to adjust its location. When you release the left click, the measurement will remain where you placed it.
Of course, perfecting the details of your project includes perfecting your 3D Measurements — which you can easily do from the panel menu. You can choose to adjust both the arrow style and the arrow size, creating the best look for your custom project.
_Photos/2017/3dmeasurements/hide-unhide-measure.jpg)
And if you need to hide the measurements, you can quickly do so by using the Tape Measures checkbox under Hide/Unhide. With 3D Measurements, you have the control you need to perfect your presentation.
Ready to Measure in 3D?
Including 3D Measurements in your screenshots, videos, and 3D Views is an excellent way to bring your client’s (and your installer’s) attention to the important details.
From outdoor kitchens to pergolas, countertops to custom features — with 3D Measurements, you can measure, highlight, and share all of the vital information about your custom projects that will help make certain the final project is as stunning as your design plans promise.
Ready to amaze your clients with the most precisely detailed designs?
Give 3D Measurements a try today — and let us know if you have any questions!


 June 26, 2017


Comments