This year marks a special one for us here at Structure Studios, because it has been 20 years since Noah designed the very first 3D swimming pool!
Since then, 3D technology has come a long way. Computers have become faster, graphics cards have become even more powerful, and innovations like VR/AR have become so accessible that, now, it takes just a lightweight tablet to present augmented reality designs to your clients — right on the spot.
And as technology has become faster and more powerful, our software has done far more than just keep up. We’ve reached milestones by developing innovative tools that inspire and support our members’ truly exceptional design work and ideas.
Recently, that list of groundbreaking tools has expanded to include new drawing tools, custom coping and scoring lines, point heights, new camera tools (including a new way to focus the view in 3D), new time-saving tools (like automatic Spell Check and Adjust Contours Mode), and new tools that use Smart Data (like staircases, steps and benches) to make your designs even more accurate, precise — and beautiful.
Now, we’re marking the 20th anniversary of that very first 3D swimming pool by giving our favorite tools and features a little extra polish — and introducing a few new ones that are sure to become favorites, too!
We’re sharing with you new ways to control your design, including a new right click menu, new font controls, new 2D view settings, and new artistic fill patterns. We’ve also enhanced a number of popular tools, including true shadows, page layout, and much more.
Ready to see what’s new? Check out the update video:
Access Tools Instantly with the New Right Click Menu

Today, we’re introducing an incredibly useful time-saving tool: the new Right Click Menu.
The Right Click Menu offers you completely new ways to control your design — with just a simple click of a button.
The old Right Click Undo has been moved to Scroll / Middle Click.
With it, you’ll gain quick, easy access to the most commonly used buttons and tools. No need to scroll down the tools panel to select matching objects or add a callout. Now, those tasks — and many more! — can be done with just a simple click near your mouse cursor, saving you time and streamlining your design process.
Right Click Menu: Design
The Right Click Menu also provides you with immediate access to great new design tools, making it even more useful!
Our top 3 favorites offer you the ability to convert shapes, jump to another stage, or find the item in the library. We think these tools will soon become your favorites, too.
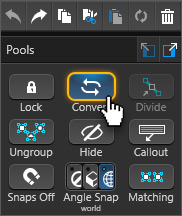
Convert Shapes
Ever discover that you drew a shape in the wrong stage? Maybe you drew a planter — and then noticed you were in the Hardscape stage? Right Click now makes it easy to convert the hardscape to a planter—even when in the Hardscape stage.
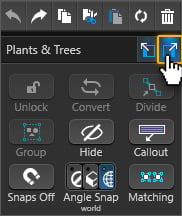
Jump to Stage
Perhaps you need to use a stage-specific setting to modify a drawn shape? Maybe, after you’ve finished drawing a pool, you decide you’d like to edit the coping on your deck? No problem! Now it’s easy to jump to the stage you need. Just right click on the deck and jump instantly to the Hardscape stage.
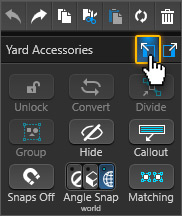
Show in Library
And if you need to search the library for an object you’ve used in a design, the Right Click Menu makes it even easier than before! Perhaps you placed a furniture set and want to add a matching accessory? It’s easy to find the collection, fast: simply right click on the item and choose Show in Library to jump right to the category.
Right Click Menu: Construction
When you’re designing beautiful and detailed projects for your clients, perfecting the details in Construction Markup and Page Layout is equally as important as choosing the right design elements for your clients — so the new Right Click Menu also offers unique menus designed to make it even easier to access the most commonly used buttons and tools.
Our top 3 favorites? Layer Manipulation, Object Settings, and Callouts.
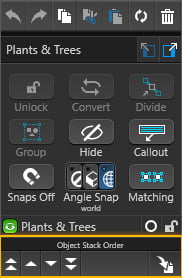
Layer Manipulation
With right click, you can now quickly change stack order and move the layer, making it easy to bring small objects to the front of your plan. Click on a large tree and send it to the back, or select a small plant and bring it to the front.
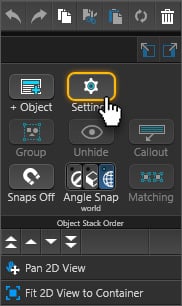
Object Settings
If you need to customize or modify your 2D view, Plant Legend, or Smart Data, the right click menu now makes it incredibly easy. Simply click the Object Settings button on your mouse cursor and make the changes you need.
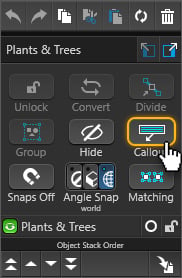
Callouts
When creating your landscape plan, you’ll now save time by quickly adding Callouts to your plants and using Select Matching to apply fills to multiple plants and trees with a simple right click.
If you prefer the old right click undo while drawing a shape, it’s now conveniently located on the middle mouse button.
And if you find, after giving the new menu a try, that you miss the old right click undo — you can move the new right click menu to your scroll wheel or middle click. We hope you will give the new right click menu a try, keep the right click menu where it belongs, and wait a week or two before changing it — we think you’ll find it a great way to save time!
Remember Last-Used Materials Between Projects

Currently, every time you draw a shape, the software automatically assigns the last material applied to that surface in your design. If you have just created a stacked stone retaining wall, for example, then the next hardscape you draw will use the same stacked stone.
Now, the last materials applied to each shape type will also be remembered the next time you start a new project.
Change 3D Text Color with Font Controls

Fine-tuning and personalizing the details of your design is what makes your designs stand out — and those custom, personalized details are a great way to surprise and delight your clients.
With this update, it’s even easier to add and perfect those details. The font button in the panel offers you the ability to quickly change the color of your 3D text — no need to head to Materials! Simply use the font controls to change the color, right from the stage where you’ve added the text.
Add 24-hr Time Lapse with Enhanced True Shadows
A great way to highlight and share the beautiful, personalized details you’ve added for your clients is by creating a compelling video.
With this update, we’ve updated and improved the true shadow location settings — making it easy to now add a complete 24-hour time lapse in Vip3D!
You can easily create a full day sun animation of your project in Video Mode.
Go to Your YouTube Channel with the New Button

Once you’ve created and uploaded your video, it’s now even easier to find it on your YouTube channel. Organizing project videos on your channel has never been easier, because this update includes a new button to go to your channel!
Construction Enhancements

When you’re creating build-ready plans for the detailed designs your clients love — the Construction Phase offers you the tools you need to make those build-ready plans perfect.
And now, to make the process seamless, we have added new tools to the Construction Phase!
Add Symbols to Lines

Embedded text has been expanded to support Symbols in Lines. Now, 24 unique symbols can be added to your line — automatically. Just draw the line, select the Symbol, and set the spacing.
It’s a great way to create landscape lighting layouts, plumbing runs, and irrigation plans.
Display Terrain Line Heights

When creating those plumbing runs and irrigation plans, it’s important to be able to see the exact height of the terrain and grade nearby.
Now, it’s easy to add a label to display the height for terrain lines. The height label for terrain lines is just like the option to display heights for Hardscapes — and just as easy to add to your projects!
Try New Artistic Fill Patterns

If you love customizing your plans with artistic fill patterns, check out the 8 new artistic fills we’ve just added in Vip3D and VizTerra!
The beautiful new fills include Mulch, River Rock, and Cobblestone as well as five new plant options: Abstract Palm, Branches, Circles, Spiral, and Three Color.
Add Margin Border in Page Layout

When you’re ready to print your plan, you will now see a new option to add a printable border around the plan. Give the new margin border option a try — and give your printed plans a great new look.
Enhancements and Bug Fixes:
- Rectangle Tool does not respect point / line snap
- Panning and cropping at the same time with the mouse disconnects 2D view
- Resetting an object does not add an undo event
- When outlining a Property Line, new shape shows Bearing and Distance
- 3D Property line in 3D view
- Taking all photo mode locations between night and day brightens day time
- Changing resolutions while recording video moves the overlay
- Fully wrapped spillovers have broken geometry
- JPEG causing checkerboard when importing Material
- Material not saving to Library correctly
- Scaled coping of raised bond beam will reset back to 100%
- Custom Material on Terrain does not save with the file
- Multiple slope lines hide after inserting object in page layout
- Inserting a new layer doesn't select the new layer
- Deleting one 3D Fill from the Fill Legend deletes all Fills for that Stage
- Inserting an image for Plant Callout resets the Fill
- Plant Legends preview image displays incorrectly
- Callout text inserts at a set size instead of matching the text that is inserted
- Page Layout: Rotated logo is not scaling correctly
- Markup: Spa highlight also highlights hardscape
- Crash: Creating new project while panning GIS
Ready for more?
Twenty years after Noah designed that first 3D swimming pool, we’re still excited about developing and sharing with you even more groundbreaking tools and features. We’re here to help you create the most visually stunning, immersive, and interactive designs for your clients — and we can’t wait to see the amazing projects that you create.



 December 17, 2019




Comments